Welcome to Yelling Tree Press embroidery Stitches page.
Full embroidery stitch instructions for the selected stitches in each Yelling Tree Press kit guide come with each Yelling Tree Press kit. We do this so that, if you wish, you can go screen-free and relax while you sew … nice! But so that you can explore other stitches too, we’ve posted instructions on this Stitches page.
We hope you enjoy using them. If you have any queries, please email yellingtreepress@gmail.com
NEWSLETTER: To keep up with Yelling Tree Press embroidery kits and embroidery news, sign up to our monthly newsletter here.
EMBROIDERY TIPS: For further embroidery tips, please click on our Tips page. You’ll find tips on how not to get in a tangle, how long to cut your thread, how to use metallic thread and more …
- How to do embroidery stitches – step-by-instructions
- How to do Back stitch
- How to do Blanket stitch
- How to do Chain stitch
- How to do Couching
- How to do Fishbone stitch
- How to do Fly stitch
- How to do French knot
- How to do Herringbone stitch
- How to do Laid work
- How to do Long & short stitch
- How to do Magic chain
- How to do Needle weaving
- How to do Padded Stem stitch
- How to do Pistil stitch
- How to do Running stitch
- How to do Satin stitch
- How to do Split stitch
- How to do Starflower stitch
- How to do Stem stitch
- How to do Trellis stitch
- How to do Whipped running stitch
- How to do embroidery stitches
How to do embroidery stitches – step-by-instructions
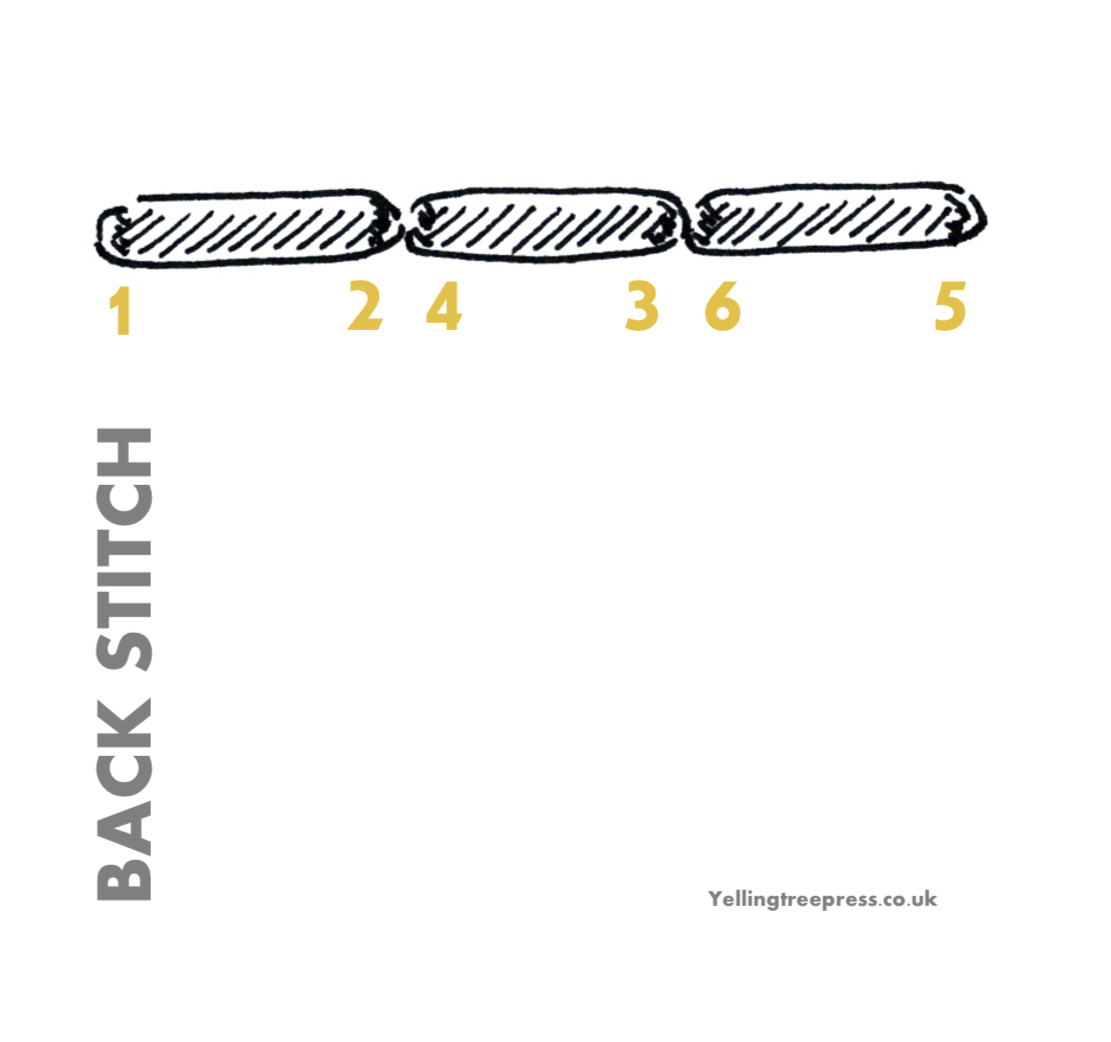
How to do Back stitch
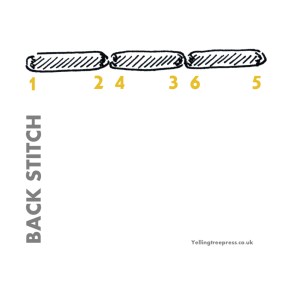
Step 1. Bring your needle up to the top of the fabric, and then insert it back into the fabric a little way away.
Step 2. *Bring the needle up a little way along, pull thread through. Then insert needle back into the fabric at the end point of the previous stitch. Your first back stitch is formed.
Step 3. Repeat from *.
• Useful stitch for: borders, outlining. A strong practical stitch too.
How to do Blanket stitch
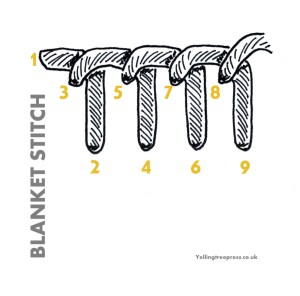

Step 1. Pass your needle up through the fabric at the point that you would like to start your blanket stitch ‘edge’.
Step 2. For all subsequent stitches: bring the needle down through the fabric a little way along the edge, and down from the edge (think of the move of a Knight in Chess).
Step 3. Then bring your needle up, going under the thread and gently pulling towards the ‘edge’.
• Useful stitch for: decorative borders.
Note: you may, if you like, change the angle and or length of the stitches for numerous design opportunities.
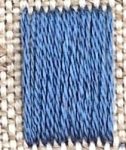
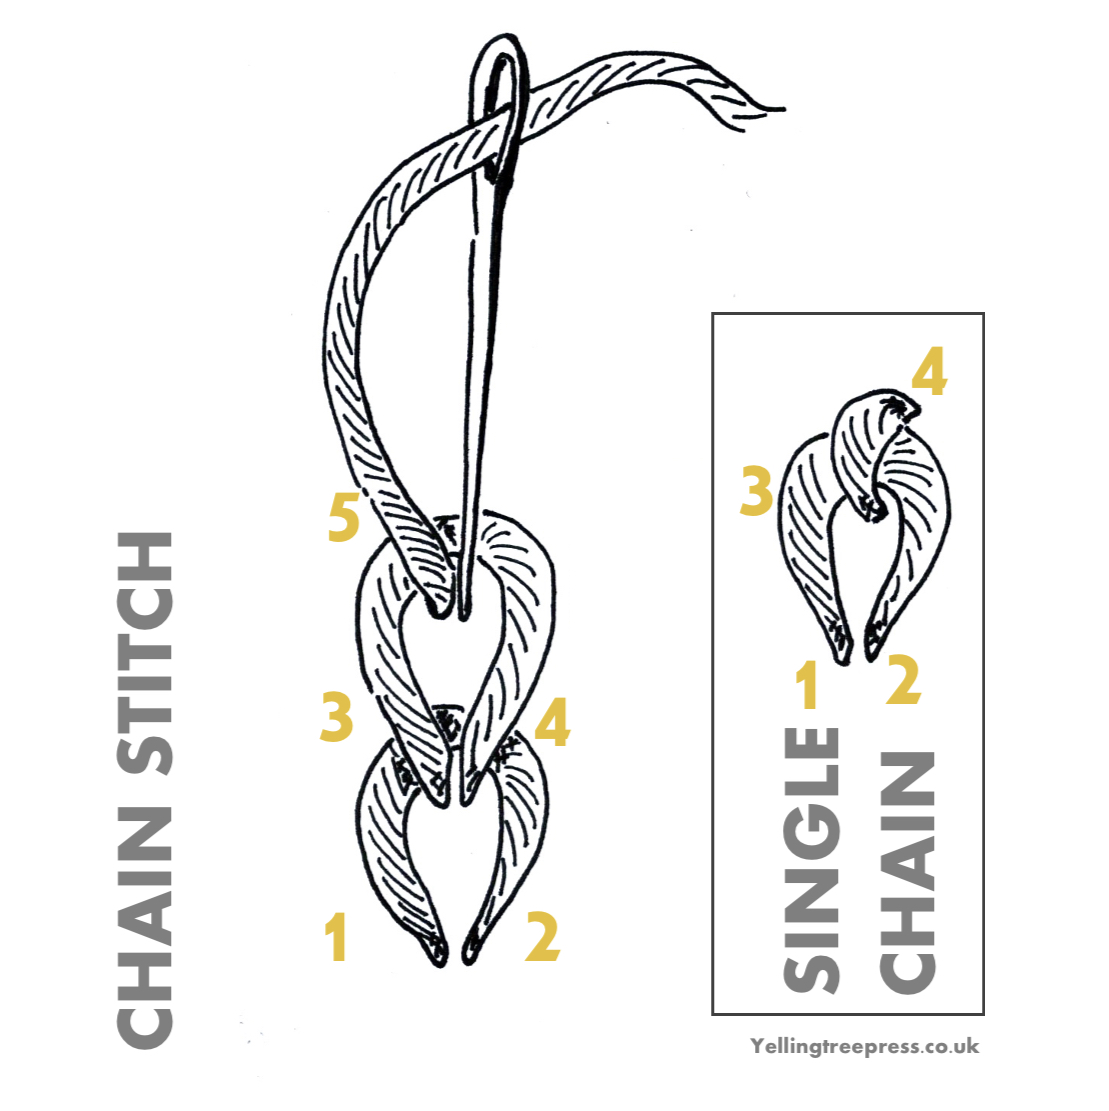
How to do Chain stitch

Step 1. To make chain stitch, pass your needle up through the fabric and then down, leaving a small loop on the top side of the fabric.
Step 2. Being careful to keep the loop there, pass your needle up through the fabric and down again, within the previous loop – each new loop securing the previous loop.
• Useful stitch: as it works well stitched in a straight line, or for flowing shapes. Try building up rows of flowing chains as a filling stitch.
Note: Place chains as separate petals in a circle for a ‘lazy daisy’.
How to do Lazy Daisy stitch
Step 1. To form a lazy daisy petal (aka a single chain stitch – see single chain image above), pass your needle up through the fabric and then down, leaving a small loop on the top side of the fabric.
Step 2. Being careful to keep the loop there, pass your needle up through the fabric again, and down over the closed end of the loop, securing it to the fabric. (This is one petal, aka a lazy daisy stitch).
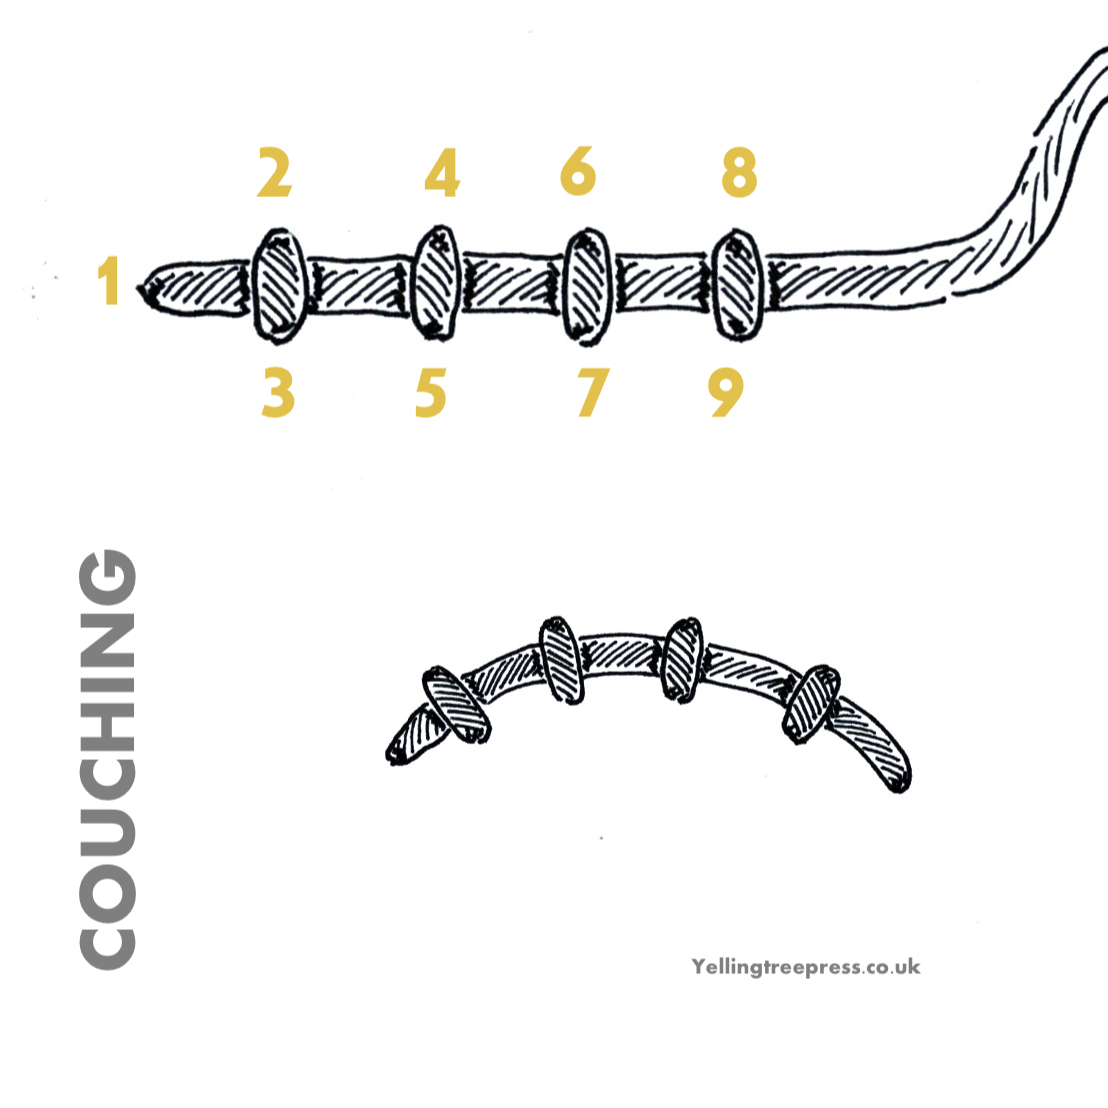
How to do Couching

Step 1. Thread needle with base thread (i.e. the thread to be couched – you are likely to want it to be chunky, e.g. 6 strands, or 3 strands works well too).
Step 2. Bring needle up at the place you want the couched thread to start. Leave that thread there for the moment.
Step 3. Now thread up a second needle with the couching thread (this could also have 6 strands, but 2 or 3 looks great and uses less thread!). Bring it up at the place at which you want to do your first couching stitch. Then bring it over the base thread, and down and right angles, on the other side of the thread, pushing the needle back down through the fabric.
This is your first couching stitch completed. Continue creating couching stitches, gradually attaching your base thread to the fabric with your couching thread stitches.
•Useful stitch for: edging and borders. Great for fluid lines.
Notes: You can space the couching stitches evenly or space them in a pattern, for instance.
If you want to use a couching stitch as the stitch to describe an angular shape (like a star) use the needle on the base thread to bring the couching thread down and up at the point of each star to enable a pointed point! (This tip is not needed, if you are describing a flowing line).
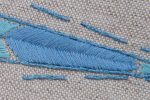
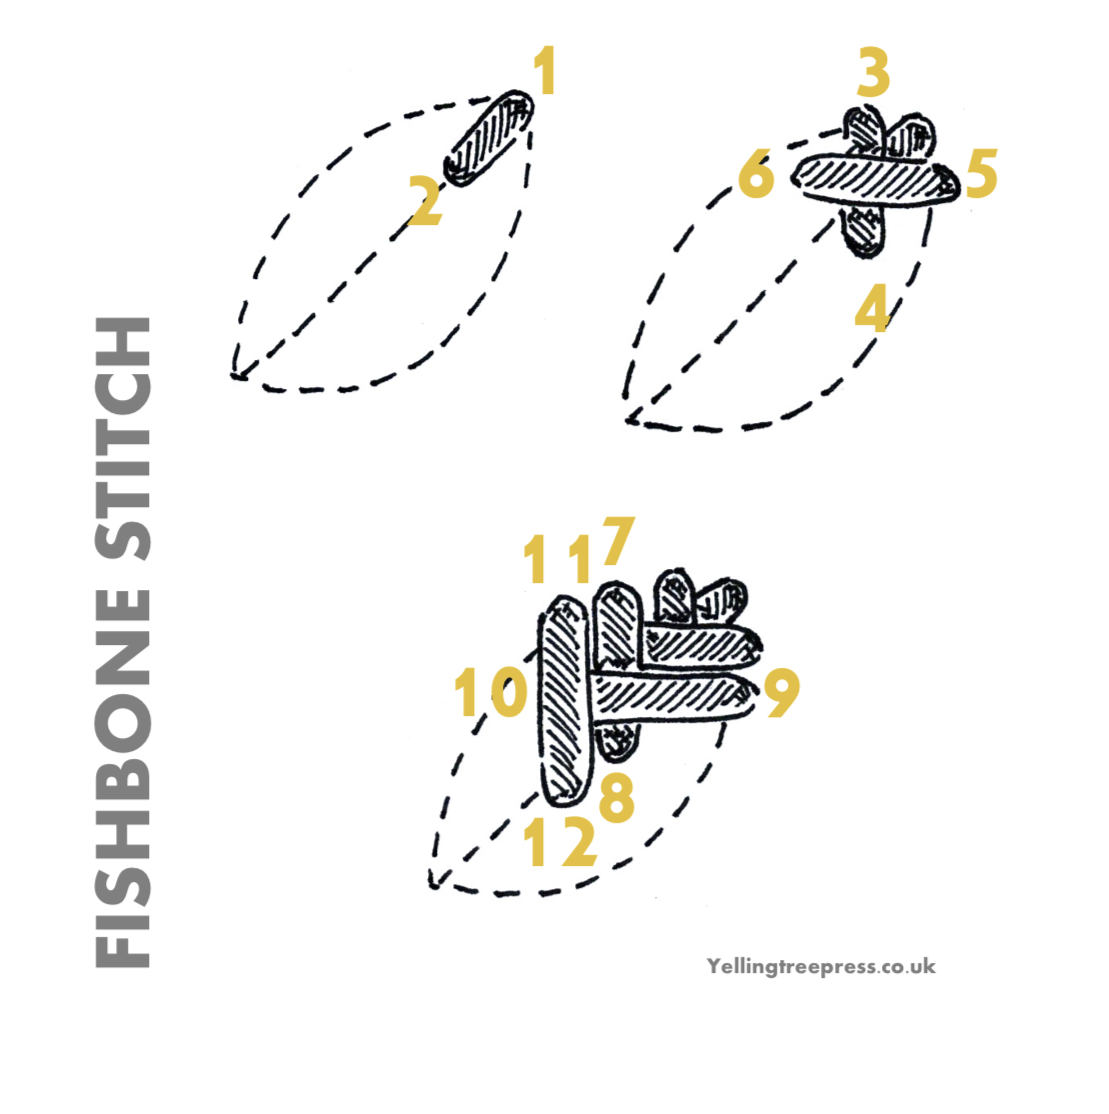
How to do Fishbone stitch
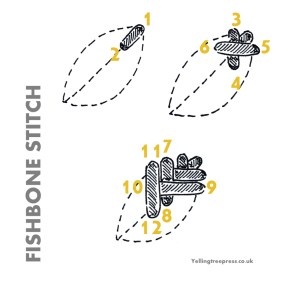
Step 1. Make the first stitch by placing a single stitch going down the ‘central line’ of the area you want to fill with fish stitch. (You can visualise the central line; or you can draw it on your canvas, e.g. in pencil).
Step 2. 2nd stitch, bring the needle up on the outside edge of your shape, and go down just past the tip of the central stitch.
Step 3. 3rd stitch, bring the needle up on the other side of your shape and go down just past the tip of the 2nd stitch.
You’re aiming to cross over, overlapping the tip of the previous stitch.
It can feel a bit fiddly to get going but you’ll soon see the lovely result.
• Useful stitch for: creating a beautiful glossy solid area of stitching.
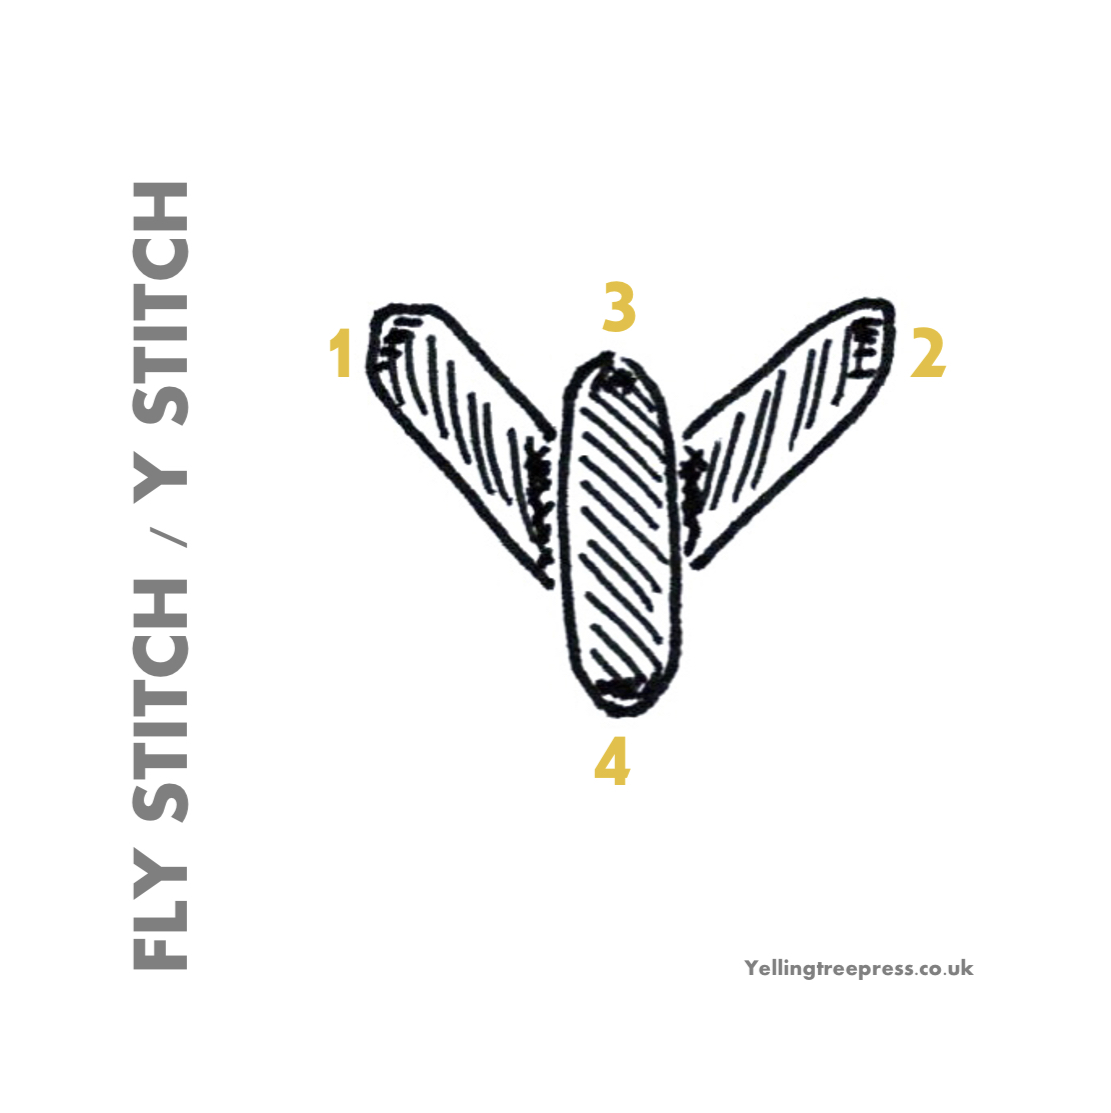
How to do Fly stitch

Step 1. Bring your needle up and down, but before you pull it taught, bring your needle up again, a little further on…
Step 2. Catch the first stitch, and bring your needle down through the fabric again, anchoring the first stitch into a V-shape with the second stitch.
Together the first and second stitch make 1 fly stitch.
• Useful stitch for: filling and borders. Can be worked in rows. Size can be graduated, large to small Vs or vice versa.
Notes: You can vary the depth or shallowness of the V and the space between each ‘fly’.
Can be combined with individual chain stitches, for instance, to create patterns.
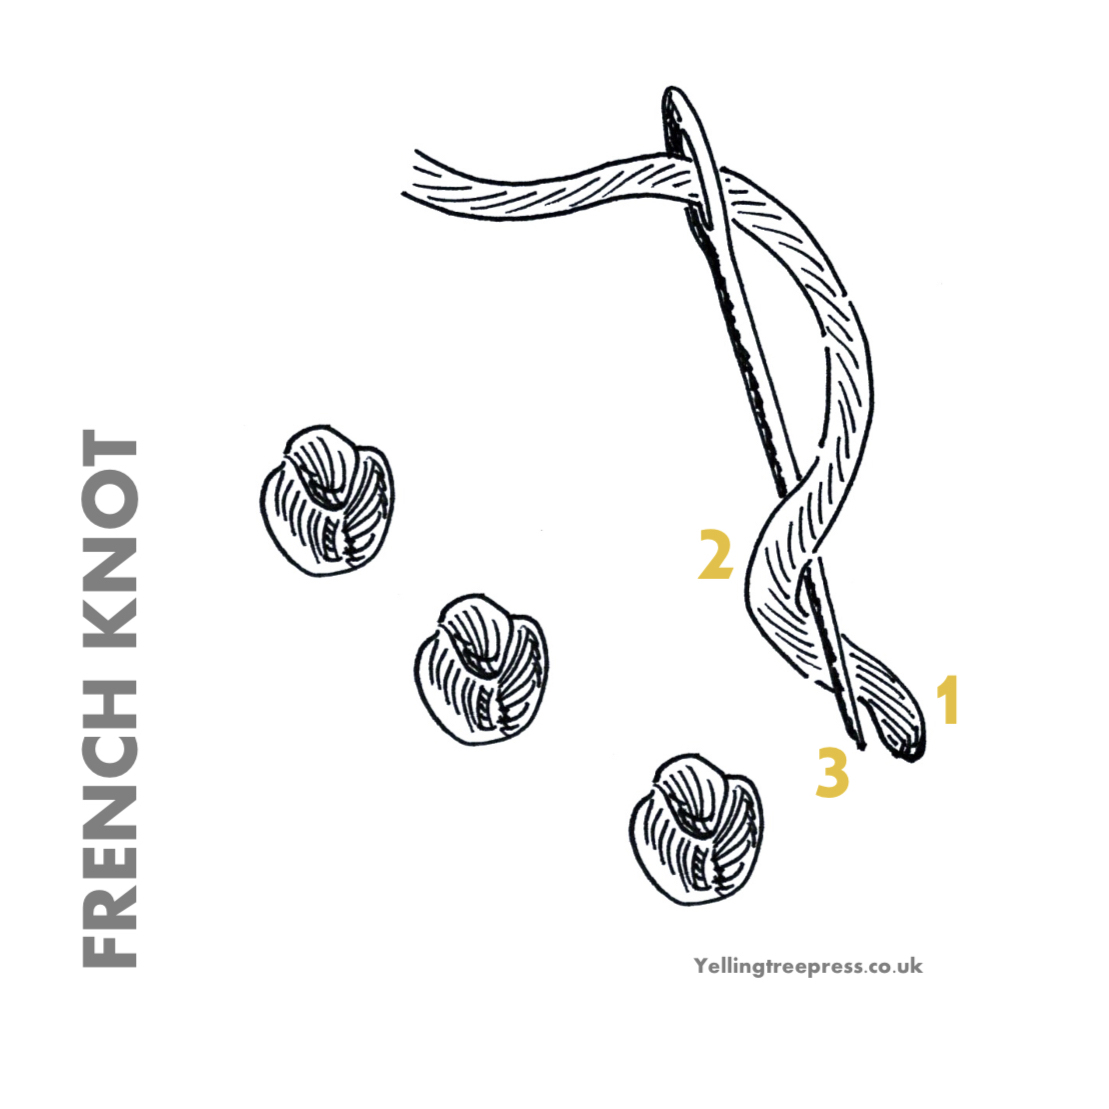
How to do French knot

Step 1. Bring the needle up through the fabric at the place where you would like the French knot to be.
Step 2. Insert the point of the needle back into the fabric very close to where it has come out. Wrap the thread around the needle once.
Step 3. While keeping a tension on this wrapped thread, carefully draw the needle down through the fabric, keeping that tension on the wrapped thread the whole time.
Your French knot is formed!
• Useful stitch for: decorations, textures, combined with other stitches to create patterns
Note: If you’d like to increase the size of the knot wrap, wrap the thread twice around the needle. Alternatively increase the number of strands you are using, eg from two to three strands.
See Pistil stitch.
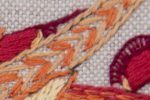
How to do Herringbone stitch
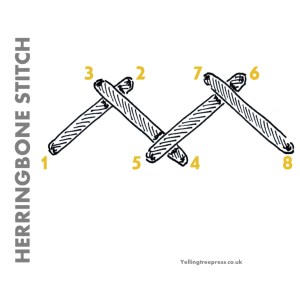
This creates a row of crossed stitches. You work a stitch from one row, then a stitch from the other row. Your stitches travel in a step forwards, step backwards direction – that’s what makes the crosses.
Step 1. Imagine (or draw) 2 parallel lines on your fabric.
Step 2. Bring needle to top side of fabric, on the top row.
Step 3. Insert needle a little way away along the bottom row.
Step 4. Move your needle back a little on the bottom row, and then bring the needle to the top side of the fabric.
Step 5. Insert the needle a little way along on the top row.
Step 6. Move your needle back a little on the top row, and then bring the needle to the top side of the fabric.
Repeat this cycle.
• Useful stitch for: borders, decoration.
Note: You may like to make a Laid work background, and then place trellis stitch over the top. Alternatively you could infill your trellis with straight stitches.
See Laid work
How to do Laid work
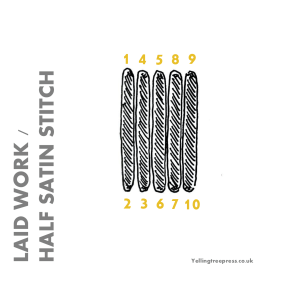
Step 1. Pass your needle up through the fabric and down to create your first stitch.
Step 2. To create the next stitch, bring your needle up very close to the end point of the previous stitch, and bring it down, again very close to the point where the previous stitch began.
Look at the back of your work, you should only have a tiny stitch on the reverse; the majority of your thread should be showing in stitches on the front of your work.
You are aiming to create parallel stitches.
They can be laid in line with the weave of the fabric, or they can be laid diagonally.
Laid work is more ‘informal’ than Satin stitch and you don’t need to create a stem stitch or similar outline first – just get stitching!
• Useful stitch for: filling in areas with an economical use of thread.
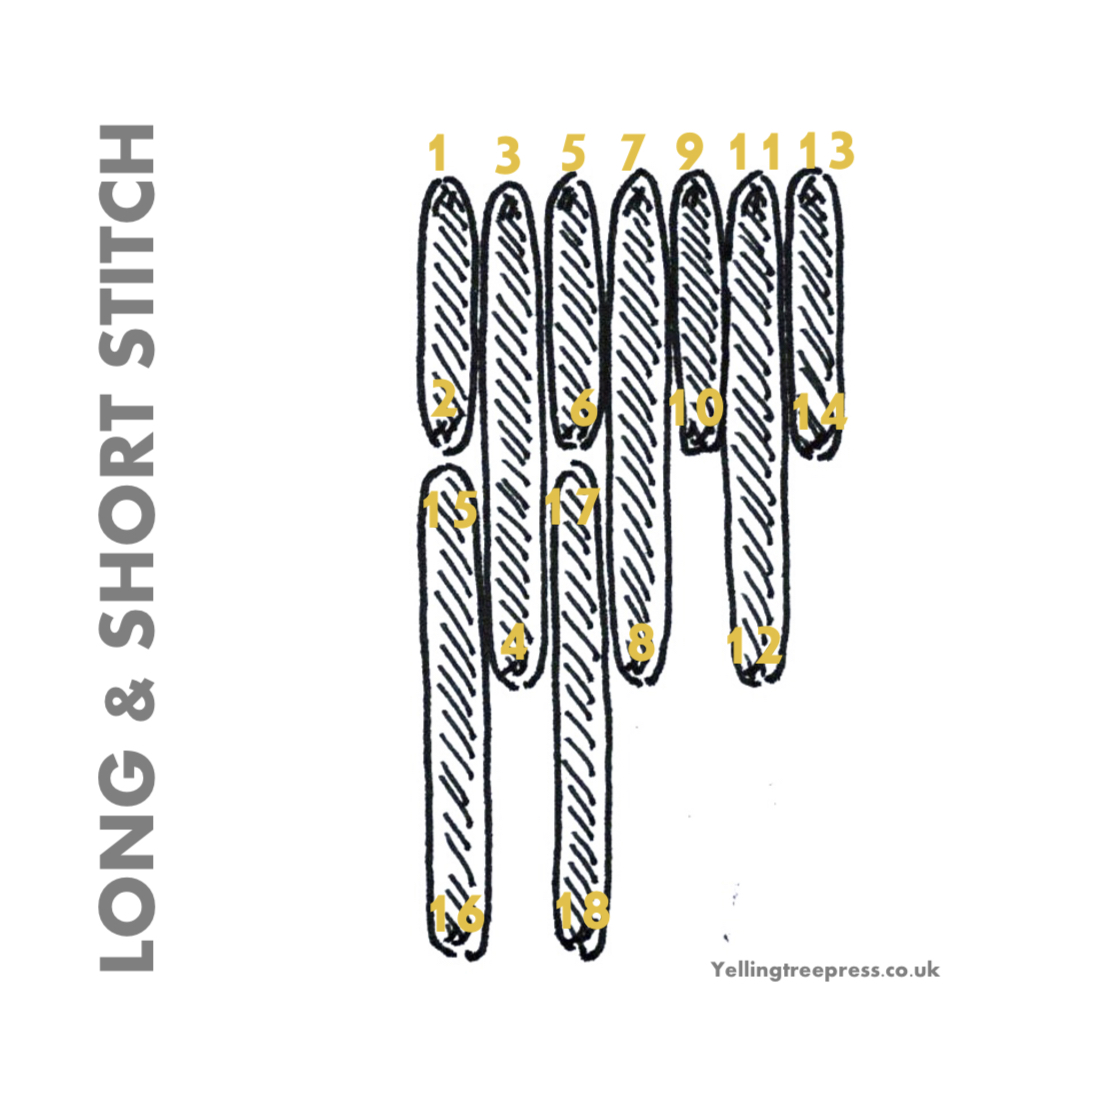
How to do Long & short stitch


Step 1. First row: work a row of parallel stitches that alternate in length, long and short.
Step 2. Next row work a long stitch to follow on from the short stitch in the previous row.
Step 3. In your next row, continue to sew using long stitches in the alternate spaces.
This is the basic principle: see the notes below for how to get your long & short stitch looking much better!
• Useful stitch for: filling solid areas, lends itself well to graduating colours. It can be used for graduating shapes too.
Long & short stitch continued
Note 1: Before embroidering your long and short stitches, outline the area you wish to fill with long and short stitch in split stitch. Ensure you cover the split stitches when you work your long and short stitches
Note 2: While the first row of long and short stitch looks so methodically “long then short”, subsequent rows need to consist of all long stitches. You will get a better, less blocky look if you vary the length of the stitches in each row as well
Note 3: From row 2 onwards, when you bring your needle up, split the previous stitch, coming up through the previous stitch. Again, this will help your stitches (and colours if shading) to blend.
Note 4: Long and short stitch works really well on organic shapes. Vary the length of stitches to allow you to describe the shape and fill the area beautifully.
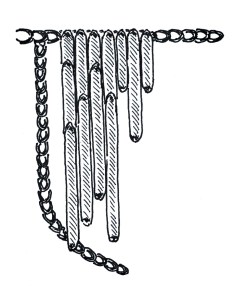
How to do Magic chain
Choose 2 colours. Thread your needle with 1 strand of each colour (i.e. your needle is now threaded with 2 strands).
Work chain stitch, however, when creating your loops, work the needle so that it only catches one loop each time, alternating the colours.
See Chain stitch
How to do Needle weaving

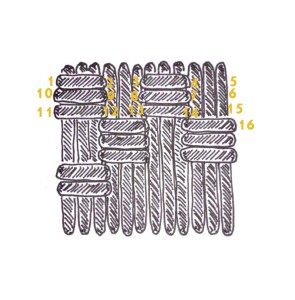
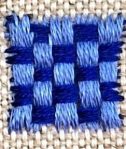
Step 1. Fill the background of the shape you wish to fill with needle weaving with laid work stitches.
Step 2. Next, thread a blunt(er) needle – for instance a tapestry needle – with your colour of choice.
Step 3. Bring your needle to the front of your work, weave your needle up and down, across the laid work stitches.
Tips: your weaving needle only weaves through the laid work stitches; it does not pierce the fabric, until it reaches the end of the ‘row’ and needs to turn, to create the new row.
• Useful stitch for: filling areas with solid colour.
Note: Experiment with weaving using the same colour thread for both directions, or different colours. Play with the number of threads you weave to create different patterns.
How to do Padded Stem stitch

Step 1. Work a row of stem stitch.
Step 2. Then choose a different colour. Work along the row, looping a stitch over the cross-over point of each previous stem stitch.
• Useful stitch for outlining. If couching doesn’t appeal, stem stitch can make a good alternative.
See Couching
See Stem stitch
How to do Pistil stitch
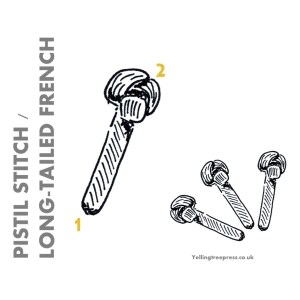
Pistil stitch is also known as Long-tailed French knot.
It’s formed very similarly to a French knot. However, whereas with a French knot you insert the needle back into the fabric, close to where it came out, with pistil you insert it a little way away – so as to create a tail.
Step 1. To create a pistil stitch, bring the needle up through the fabric at the point you would like the tail end to be.
Step 2. Wrap the thread around the needle once.
Step 3. Keeping a tension on the wrapped thread, insert the needle back into the fabric, a little way away from to where it came up (to allow the formation of the tail).
Step 4. Still keeping that tension on the wrapped thread the whole time, carefully pull the needle back down through the fabric.
Your pistil stitch is formed.
• Useful stitch for: decoration, textures. For tiny star rays for instance.
Note: If you’d like to increase the size of the knot wrap, wrap the thread twice around the needle., or use a greater number of strands to create the stitch. Eg thread your needle with 3 strands, as opposed to 2.
See French knot
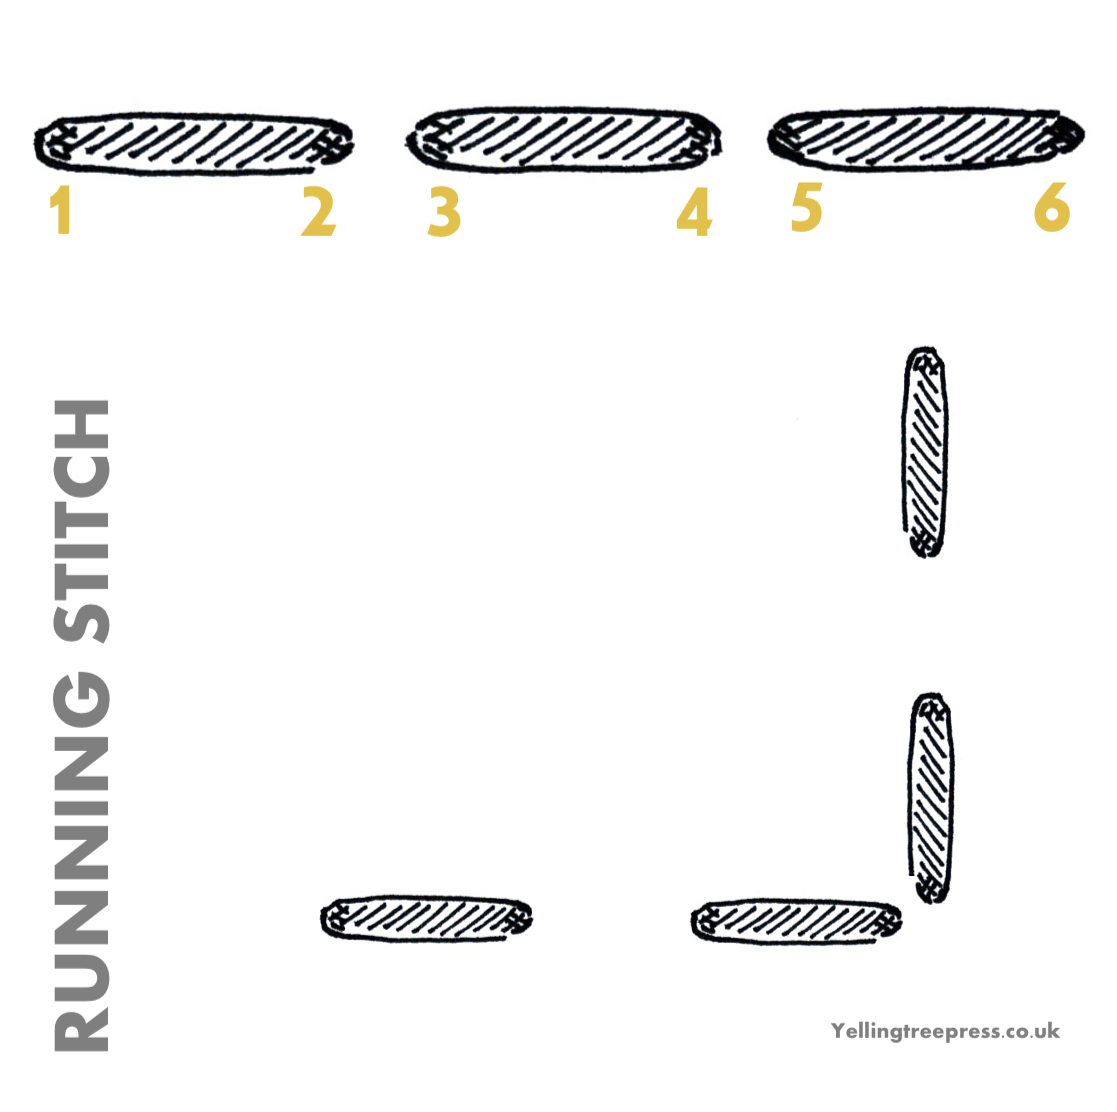
How to do Running stitch
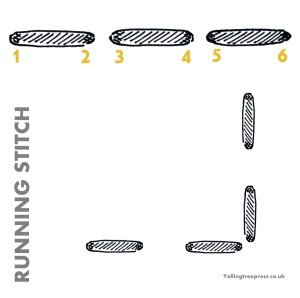

Running stitch is just a series of straight stitches.
Step 1. Bring your needle up to the top of the fabric, and then insert it back into the fabric a little way away. Your first stitch is formed. Repeat.
Tip: The key with running stitch is to aim to keep the stitches a regular length – i.e. the same length as each other. Likewise with the spaces between the stitches – aim to keep them the same length as each other. Beyond that you can be as decorative (or practical) as you wish. Stitch rows of running stitch to create a simple, pleasing border.
• Useful stitch for: borders, decoration. A practical constructive stitch too.
Note: Stitch variation – seed stitch: Placing individual straight stitches randomly to fill an area is known as seed stitch.
See Whipped Running stitch
How to do Satin stitch
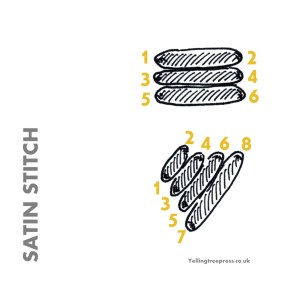
Step 1. Pass your needle up through the fabric and down to create your first stitch.
Step 2. Create another stitch parallel to the first. Repeat.
Tips to help your satin stitch look good:
• You may like to outline the area that you wish to fill with satin stitch in stem or split stitch. Then sew your satin stitch, over the top, ensconcing the stitched outline.
• Keep your stitch tension as even as you can;
• Keep your threads untwisted;
• Keep your stitches a manageable length – you’ll know when they are getting too long and losing that plump satin puff.
• Experiment with the number of strands you’re using. E.g. if you are using 2 strands elsewhere in your embroidery you may decide on 3 or 6 for your satin.
• Useful stitch for: filling smaller solid shapes. (Perhaps using long and short stitch for larger areas).
Notes:
You can reduce the quantity of embroidery thread you use in satin stitch by doing ‘half satin’, also known as laid work. Do so by bringing the needle up very close to the location of the end of the previous stitch. This will save you using up thread on the reverse of the work. It can be harder to get a plump look and even tension however, so regular satin stitch will definitely be more rewarding for your efforts.
Having said that, ‘laid work’ and is a valid and attractive stitch in its own right. It is less ‘plump’ than satin, but is a quick and economical way to fill areas – you can embellish it further, for instance with trellis stitch…
There is no single correct answer – it depends on the aesthetic you are working towards.
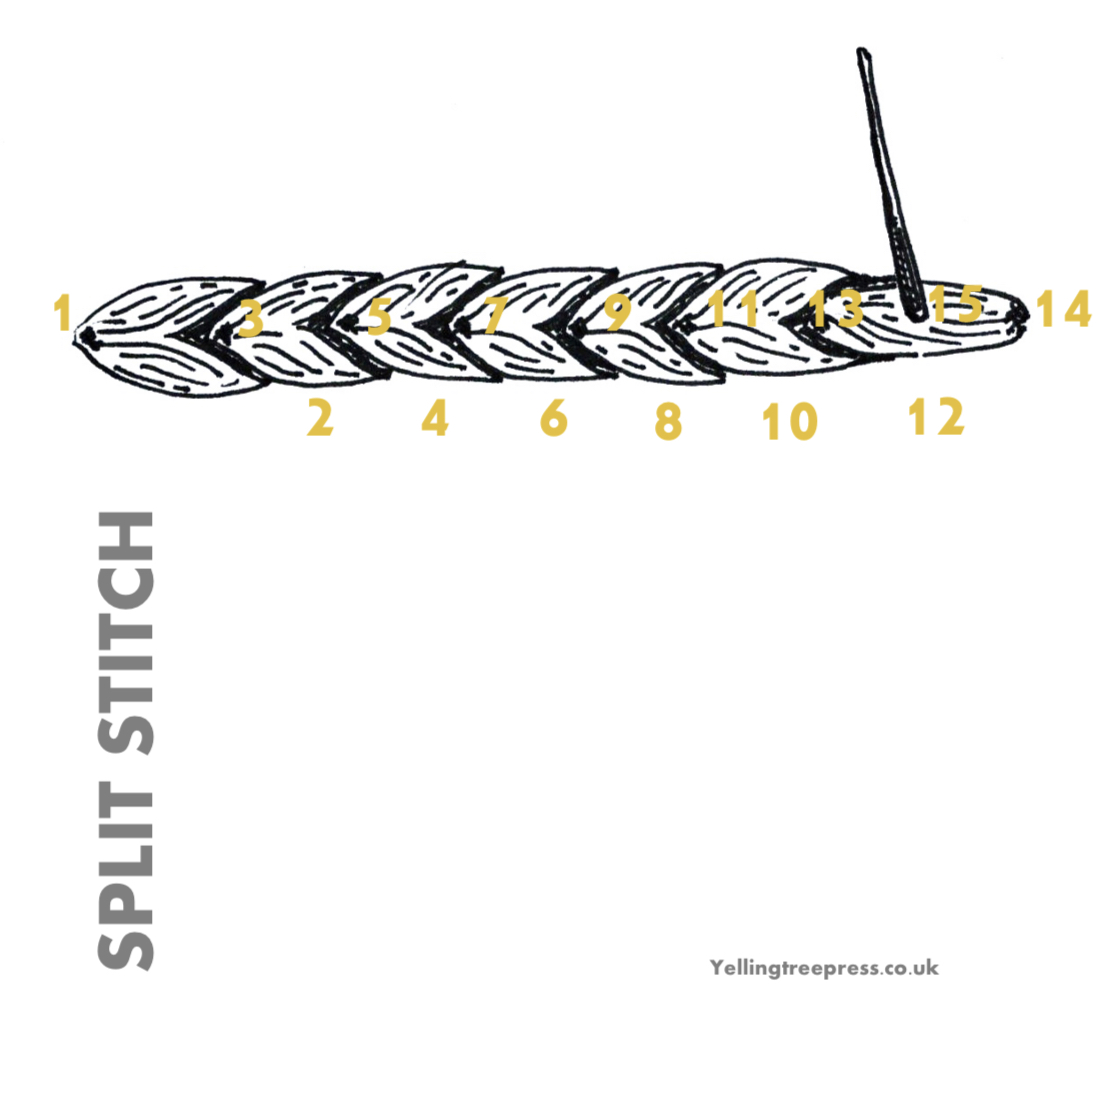
How to do Split stitch


Step 1. Pass your needle up and down through the fabric to create 1 straight stitch.
Step 2. Pass the needle up through the middle of the first stitch, splitting the threads. Pass your needle down through the fabric creating the second stitch.
Step 3. Pass the needle up through the middle of the second stitch splitting the threads, and down through the fabric creating the third stitch. Repeat.
• Useful stitch for outlining or for filling solid areas.
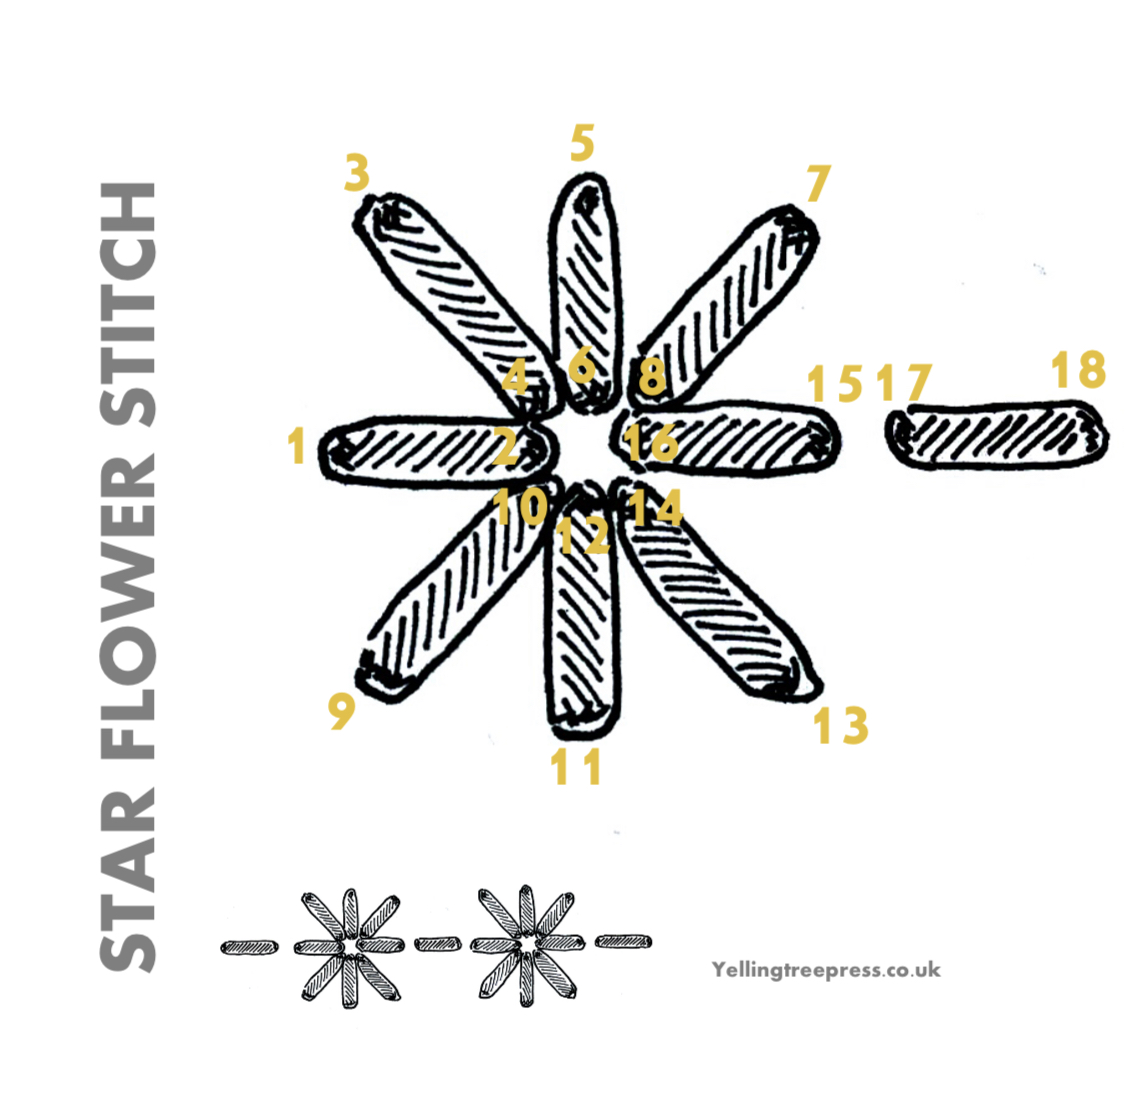
How to do Starflower stitch

Step 1. Sew one straight stitch.
Step 2. Bring your needle up at the outside edge of your first ‘ray’.
Take your needle back into the fabric, to create the first stitch (‘ray’) of the Starflower.
Step 3: Repeat for the other rays of the Starflower. You can do 6 or 8 stitches.
Step 4: Make your final ray, the ray that will be in line to be the ‘exit’ ray, allowing you to move on to the next straight stitch – ie the ‘link’ between the Starflowers.
Tip: If you always insert the needle in the centre of the Starflower then it will be near identical front and back.
• Useful stitch for: creating borders, filling backgrounds. Can be stitched to create an orderly ‘grid’; or may be stitched in flowing lines.
Note: James Tovey invented Starflower stitch in 2025, inspired by Holbein stitch which is identical, front and back. Starflower stitch is very similiar to Algerian cross stitch used in canvas work, but allows you to create a continuous row of stitching. The Starflowers can be identical in size, or graduated. You can vary the number of running stitches you place between each Starflower.
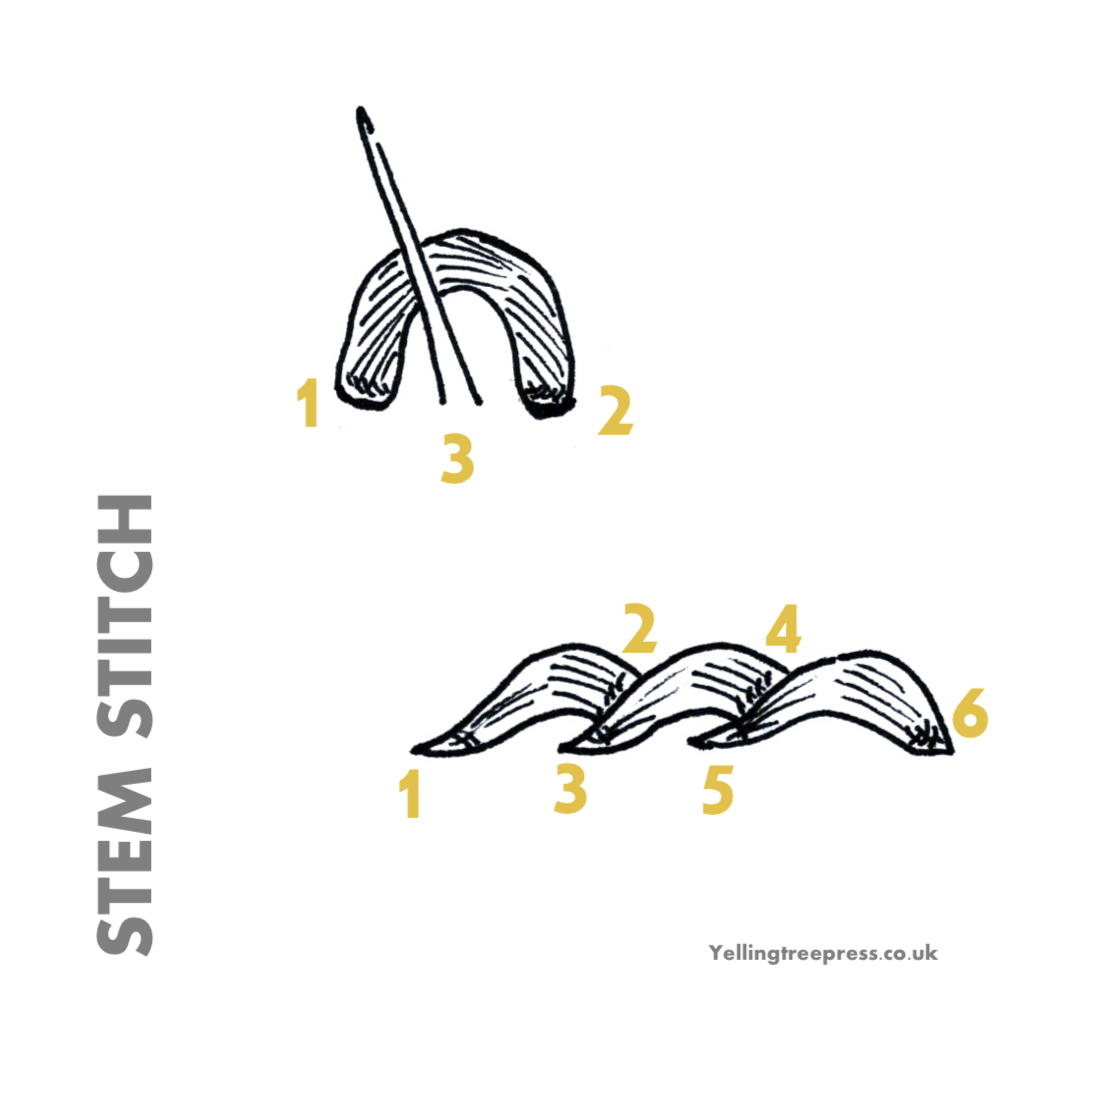
How to do Stem stitch

Step 1. Make one straight stitch.
Step 2. Bring your needle up, about halfway along the first stitch, snugly underneath, so that it gently pushes the first stitch over to the side a little. Repeat.
Tips to help your stem stitch look good:
• Remember to keep bringing your needle up on the same side of the stem, so that the preceding stitch is always eased over to the right, or always to the left.
• Option 1: Keep your stitches quite small. E.g. if your needle is threaded with 3 strands make each stitch about 3 to 4 mm long. If it’s threaded with 2 strands make each stitch 2 to 3 mm long. This will help you get a nice snug twisted curve look.
• Option 2: Do the stitches long – as long as you wish!
• Useful stitch for outlining and flowing lines.
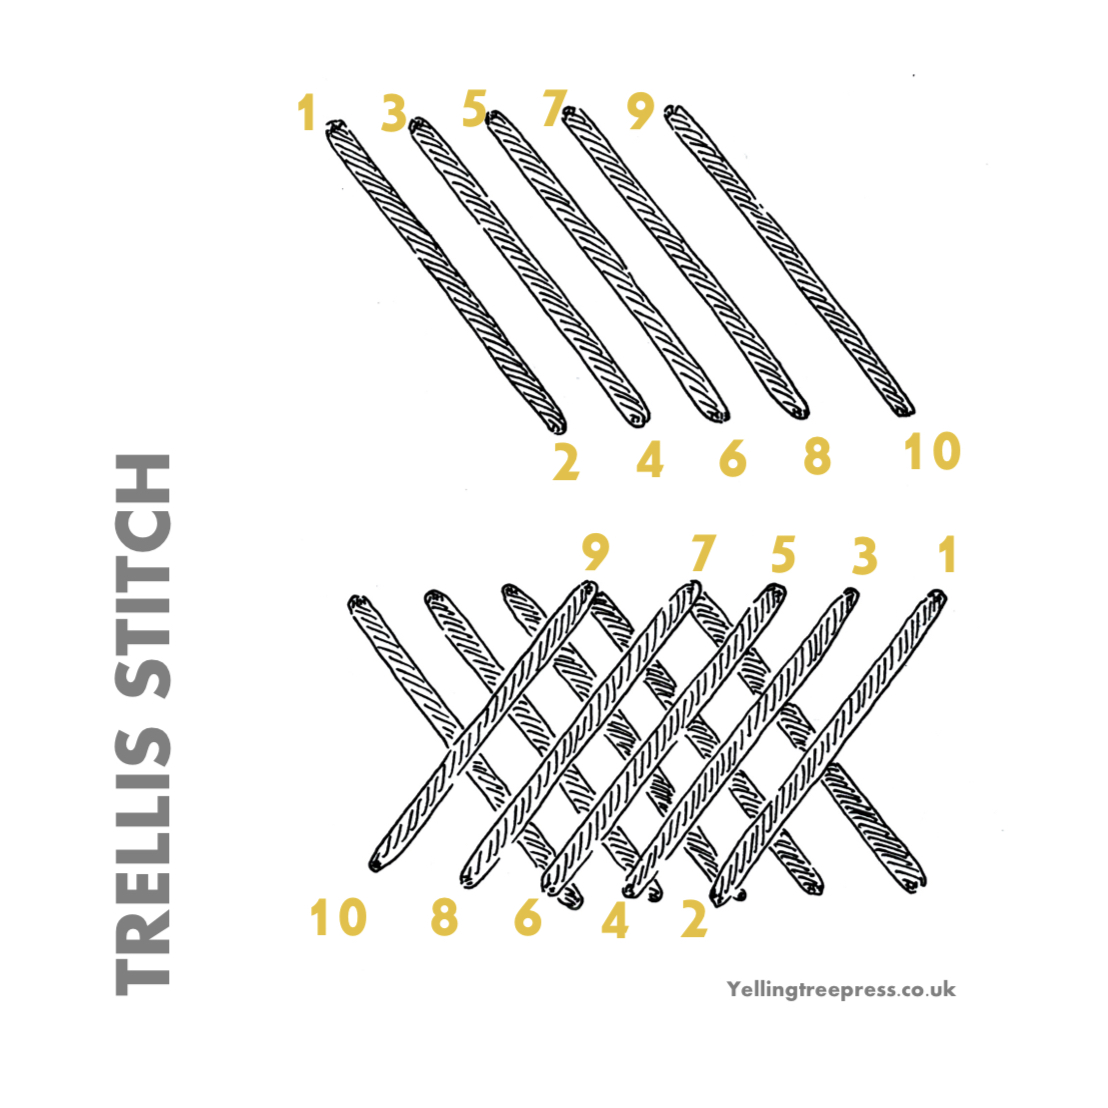
How to do Trellis stitch
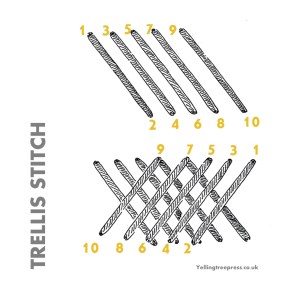
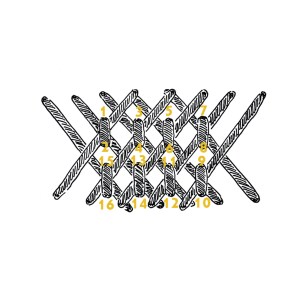
Step 1. Sew a set of evenly spaced and parallel stitches.
Step 2. Then sew a set of evenly spaced and parallel stitches at, for instance, right angles to the first set.
Step 3. Next sew a stitch at each cross point, to secure the trellis. This securing stitch could simply be one straight stitch, or a cross stitch. You may decide to sew it in the same colour, or a different one to the trellis.
• Useful stitch for: filling areas, large or small, quickly and with relatively little thread.
Note: If you sew your second set at right angles, your trellis will comprise little squares. If you wish to create a diamond trellis, just angle accordingly.
Trellis is a really versatile stitch – you may like to trellis on top of a laid work background. Or include a decoratiive stitch within each ‘square’ of the trellis.
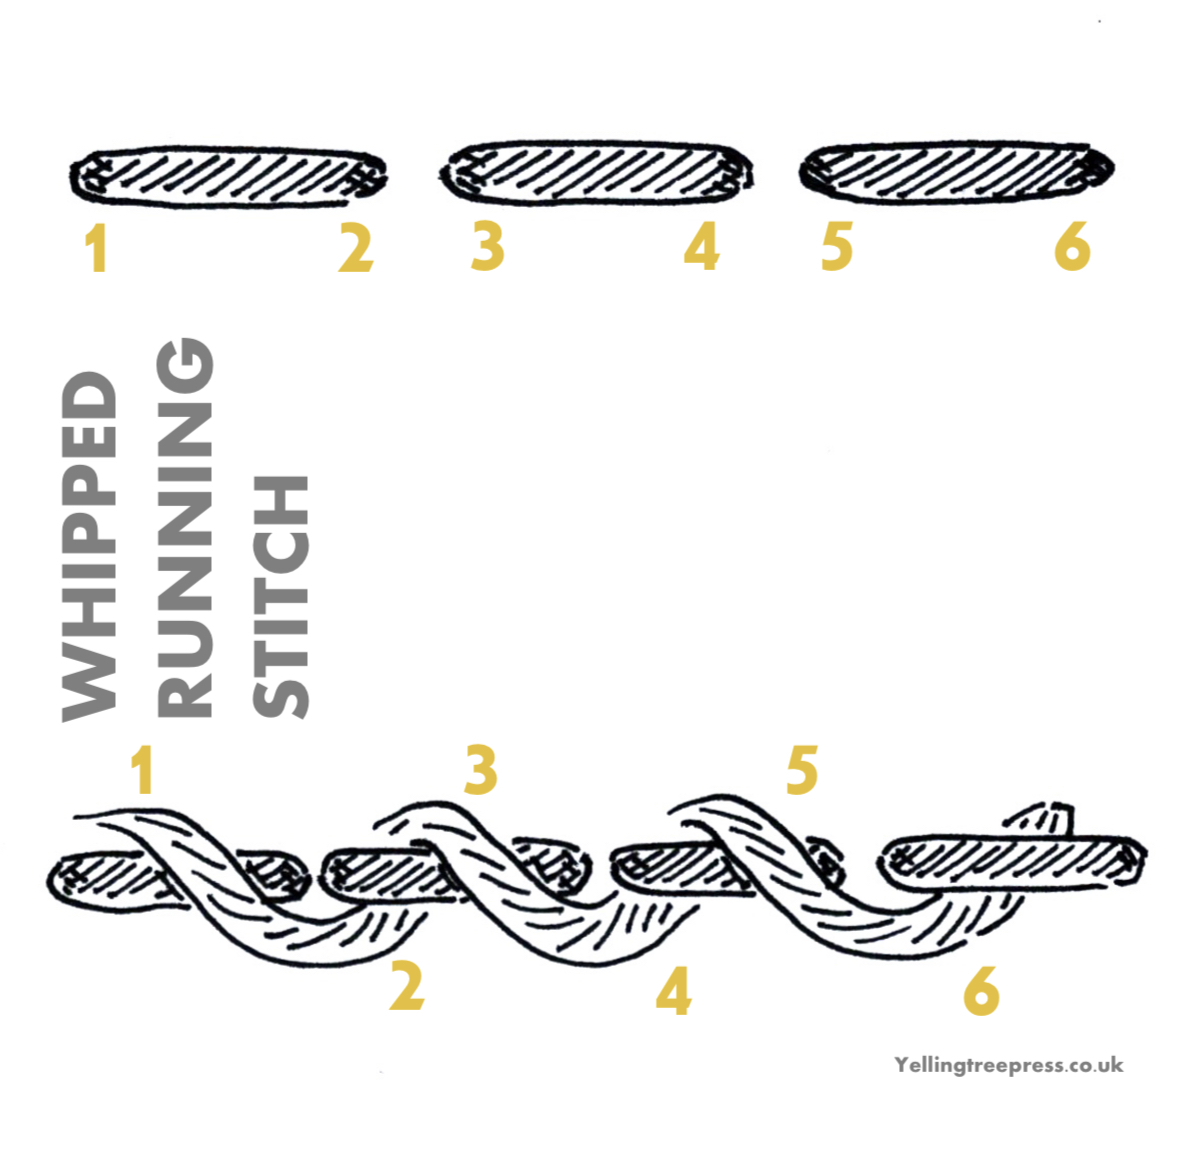
How to do Whipped running stitch
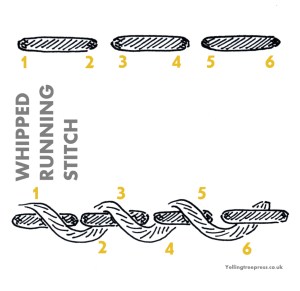
Step 1. Complete a row of running stitch.
Step 2. Now you are going to “whip” it. To do this, thread your needle with a different colour (you can use the same colour as for the running stitches, but a contrasting or complementary colour looks good). Bring your needle to the top of the fabric.
Step 3. Now – keeping your needle on the front (ie top side) of the fabric, carefully insert it under the first running stitch and pull it through.
Repeat along the row of running stitch.
Note: be careful to always work each “whipped” stitch in the same direction – i.e. always pulling it away from you for instance.
• Useful stitch for: decoration.
See Running stitch
How to do embroidery stitches


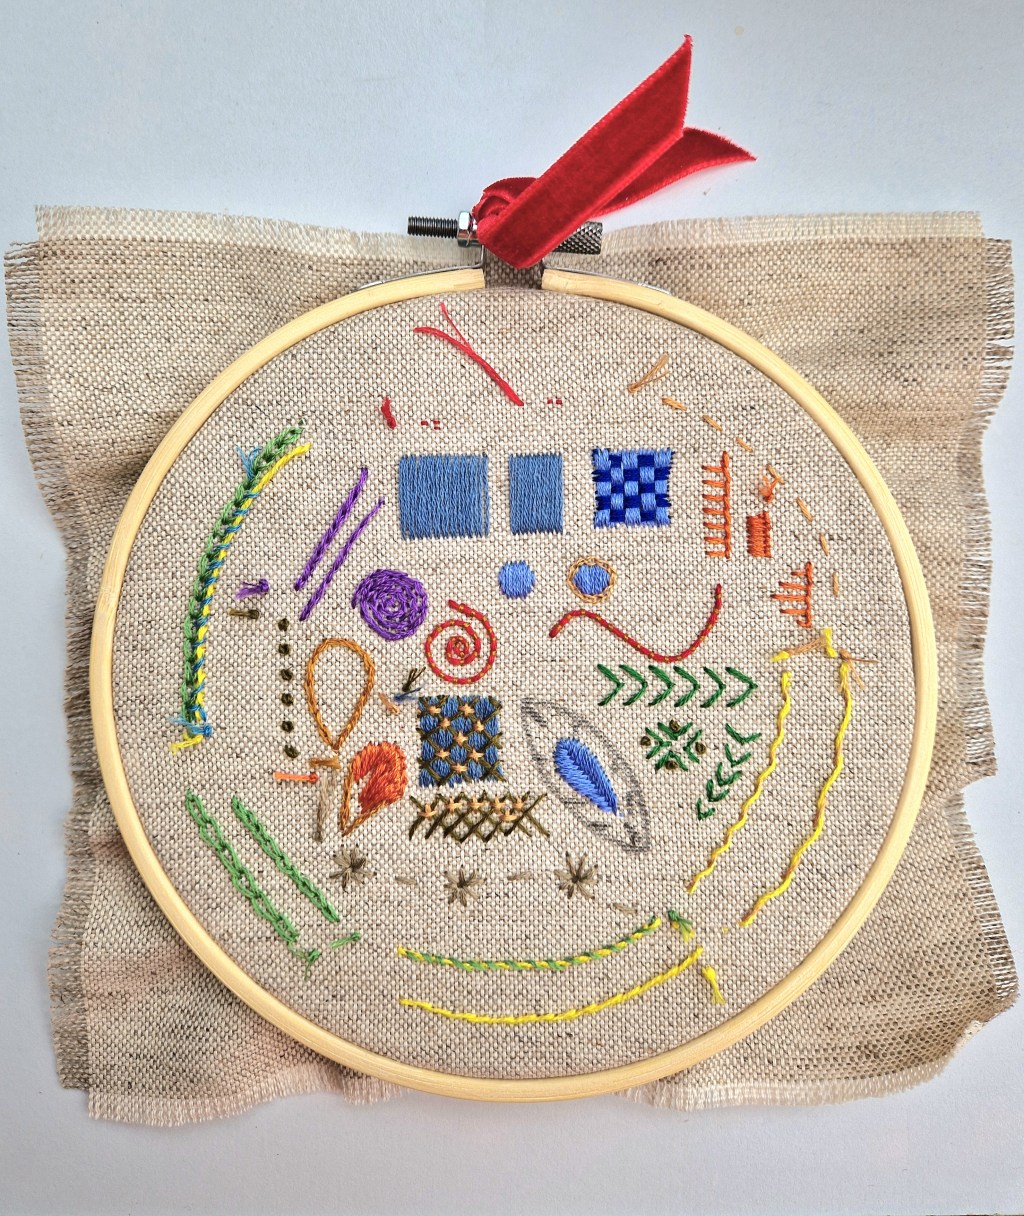
EXPLORE WORKED EXAMPLES: see the tips and notes giving just one set of ideas as to how the Moon kit and the Sun kit may be worked.
